

T (850) 550-9988
Email: [email protected]
TheWalkingBike.com
175 Main Street Suite 65 - Destin, FL 32540
|
 |
 |
 |
 |
 |
 |
 |
|
|
Welcome to Lopifit!
I am writing this afternoon to thank you for becoming our newest Lopifit rider.
In a few days you will be receiving your bike via FedEx fright delivery to the
shipping address you provided. We will email your Fed Ex
Tracking number. Use this number to track the shipment
and anticipated delivery of your bike.
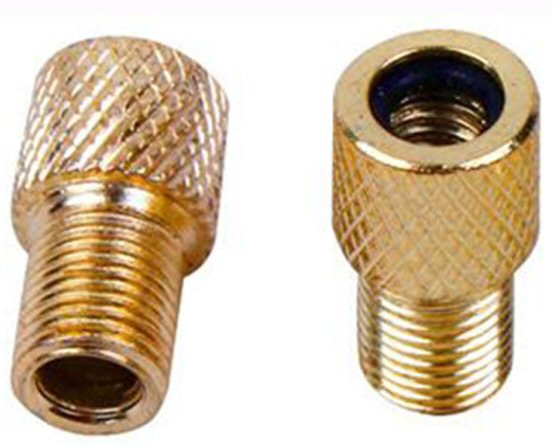
You will also be receiving two other items in the next couple of days via
Amazon. They are a set of adopters that
will convert the Presta valve tube stem where you inflate the tube/tires that is
on the bike to the Schrader value style more commonly used
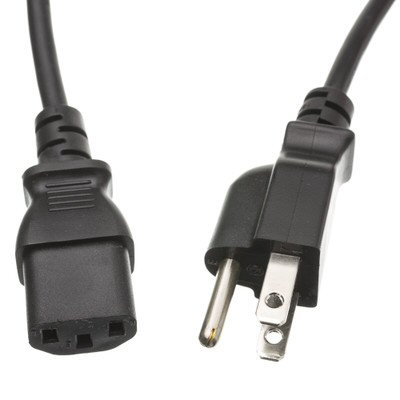
here in the USA. Additionally you will be receiving the US compatible power cord
adapter for your battery charger. Please disregard the European power cord in
the charger box.
Prior to receiving your bike(s), I wanted to
provide you with some helpful hints about unpacking your bike(s), assembling
your bike(s) and taking your initial ride on your Lopifit.
First and foremost, when
you receive your bike(s) the box may be slightly damaged as is common in the
freight shipping industry. This does not necessarily mean the contents are
damaged. However, it is VERY
IMPORTANT that you do not sign your
delivery receipt until you have opened the top of the box and looked inside to
make sure there is no physical damage such as dents, scrapes, dings, scratches
etc. on your bike. If you notice a hole or a puncture in the box please inspect
the bike primarily at those locations for possible damage.
Once you have inspected the bike and you see there is no damage, please sign the
delivery receipt and allow the driver to go about his/her day. If you
notice damage of any kind to the bike, please take pictures of the suspected
damage immediately and email them to [email protected] and
to me directly at [email protected]. Then
call our offices while the driver is still there so we can provide further
instructions.
Attached hereto are a couple videos, PDF and JPEG files that will assist you in
assembling your bike(s) and becoming familiar with certain components of the
bike. Please remember that like many new things that are introduced to our day
to day lives, or even the technological advancement of certain everyday items
such as cell phones, requires some patience while becoming familiar with the
item and there is a learning curve to mastering the use and benefits of the
item. Your Lopifit bike is no exception.
This video is a basic instructional video provided by the parent company in The
Netherlands on how to assemble your Lopifit.
As additional assistance, please download the attachments in this email titled
Lopifit Manual (ENG).pdf, HMI Display Manual June 2018.PDF, Promax Solve Disc
Brake Manual and the attached pictures of the valve stem adapter, the power
cord, and the Allen wrench set. These pictures are discussed a little later in
this email. In these attachments, you will find additional helpful information
about the components of your Lopifit as well as additional assembly and
adjustment information.
Please be aware that we are here to assist you during the assembly of your
Lopifit so please do not hesitate to contact us. Always contact us BEFORE you guess at how
something should be done or how things fit together etc so as not to assemble it
incorrectly or in a manner that may cause damage to your Lopifit.
As mentioned above, like many other products on the market today, becoming
familiar with how the bike operates and how it is put together may take a few
minutes of your time. So again, I cannot stress enough that you contact
us BEFORE you make any changes to the bike, pull tug of force
any of the cables or of the few parts that require assembly for your Lopifit to
be complete. And by all means do not disassemble the bike in any way
without contacting us first.
The tools you will need for the assembly and long-term maintenance of your
Lopifit are:
Upon inspection and assembly of our first Lopifit
bikes manufactured in The Netherlands here at our corporate location in Destin,
Florida, I also noticed a couple other items that I must bring to your
attention.
AFTER YOUR LOPIFIT IS
ASSEMBLED BUT BEFORE YOU TAKE YOUR FIRST RIDE...PLEASE READ...VERY IMPORTANT
Now that your Lopifit is assembled it is time to take your first ride.
There is one more VERY
IMPORTANT item that you will need to pay attention to on the
first few time you ride your bike. That is the adjustment of the treadmill belt.
As I mentioned this is VERY
IMPORTANT!. Please refer to the attached video link and the
manual for direction on how to adjust the belt.
PRIOR TO YOUR FIRST RIDE
PLEASE WATCH THIS VIDEO!
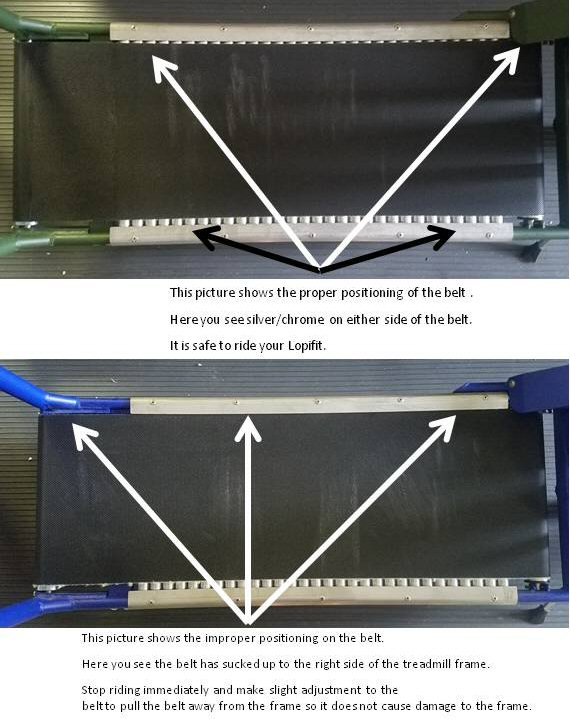
Please be aware that the belt is supposed to move from one side to other and
back as you walk and as the belt turns. As shown in the picture with the green
bike, there simply needs to be a little silver/chrome showing of the rollers on
either side and you are good to ride (SEE ATTACHED PICTURE). However,
it is IMPERATIVE that
you stop riding the bike if you notice the belt gravitate (suck up) to one side
of the frame or the other (SEE
ATTACHED PICTURE) AND MAKE THE APPROPRIATE ADJUSTMENT. If the
belt sucks up to one side or the other as shown in the picture with the blue
bike, STOP RIDING IMMEDIATELY and
adjust the belt. Please note that the belt will generally never be perfectly
centered on the rollers as once again, the belt is designed to move from side to
side. Please email us with any issues or questions about adjusting the belt.
You may also want to visit the following link to our site for additional helpful
information.
Adjusting the Lopifit Brakes
Thank you once again and congratulations on your
new Lopifit electric walking bike.
Lastly, please confirm receipt of this email and
that you were able to upload all attachments and that the links provided were successfully
opened as well.
Best
Regards,
|